
 199
199
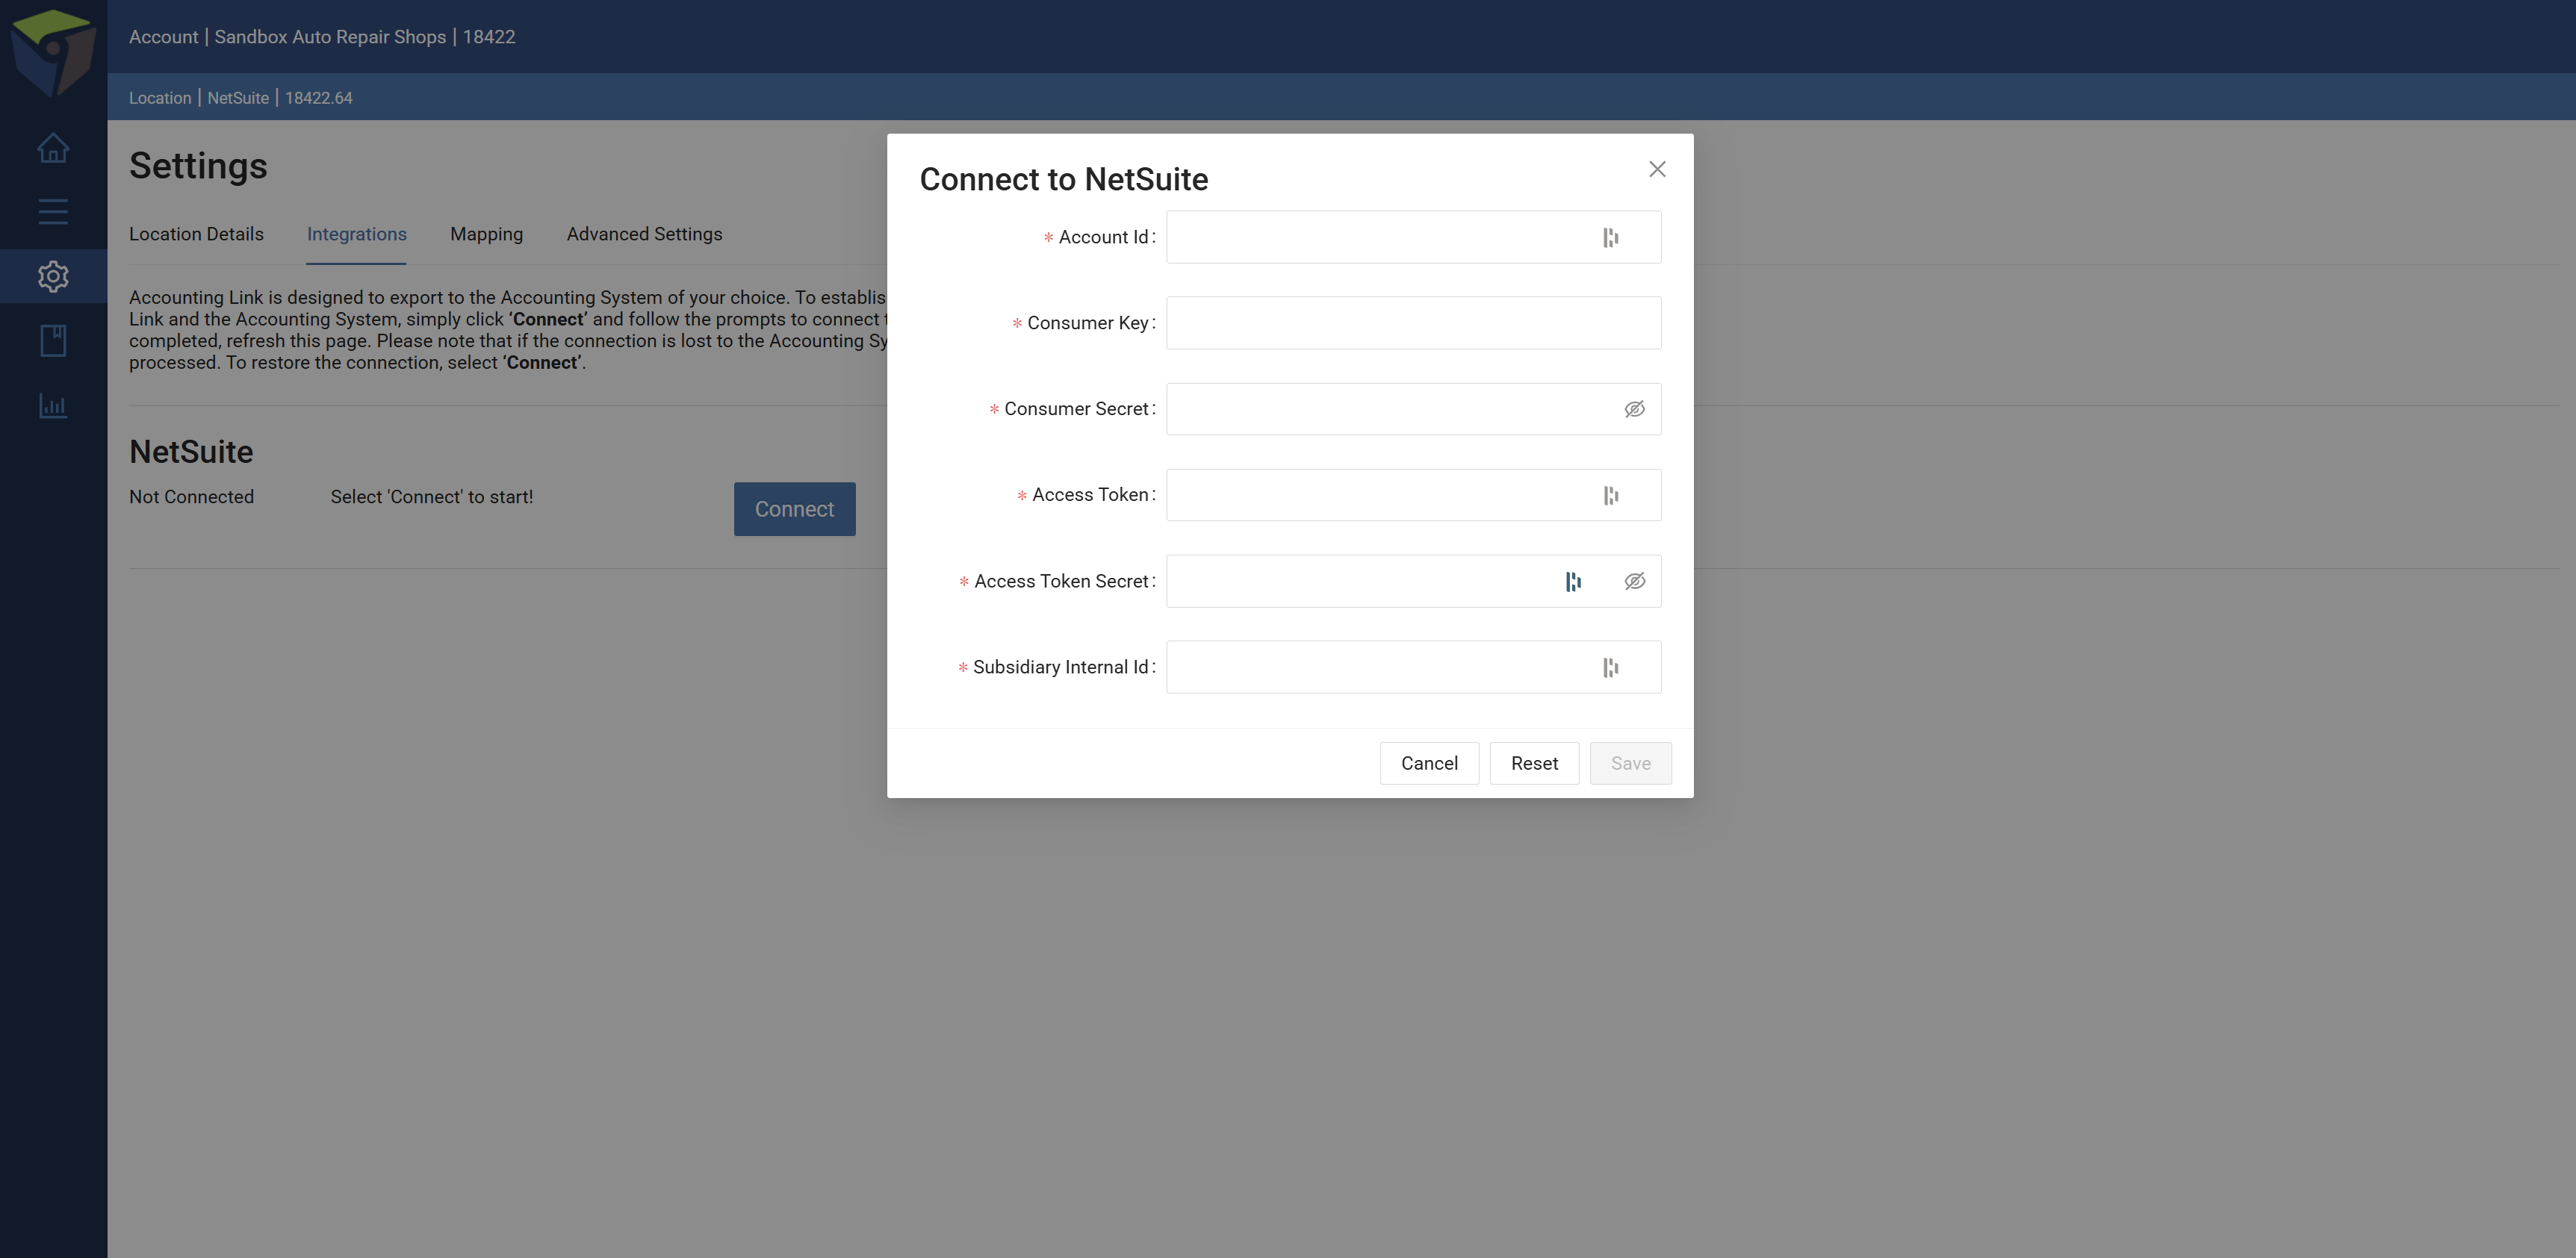
This article reviews how to establish a connection to NetSuite in Accounting Link Online.
The components needed to connect Accounting Link Online and NetSuite are outlined below:
- Account Id: This is the unique Id of the NetSuite account.
- Consumer Key: A unique key provided when the integration record is created.
- Consumer Secret: A secret or password provided with the consumer key when the integration record is created.
- Access Token: A unique token provided when the Access Token is created.
- Access Token Secret: A secret or password provided with the Access Token when the Access Token is created.
- Subsidiary Internal Id: The Unique ID associated with the NetSuite Subsidiary you'd like to connect to.
To get the credentials outlined above, you'll need to...
- Enable SuiteCloud Features in NetSuite
- Enable Payment Processing Features
- Create an Integration record
- Create a role and assign it to a User
- Create an Access Token for the Integration record, User, and Role
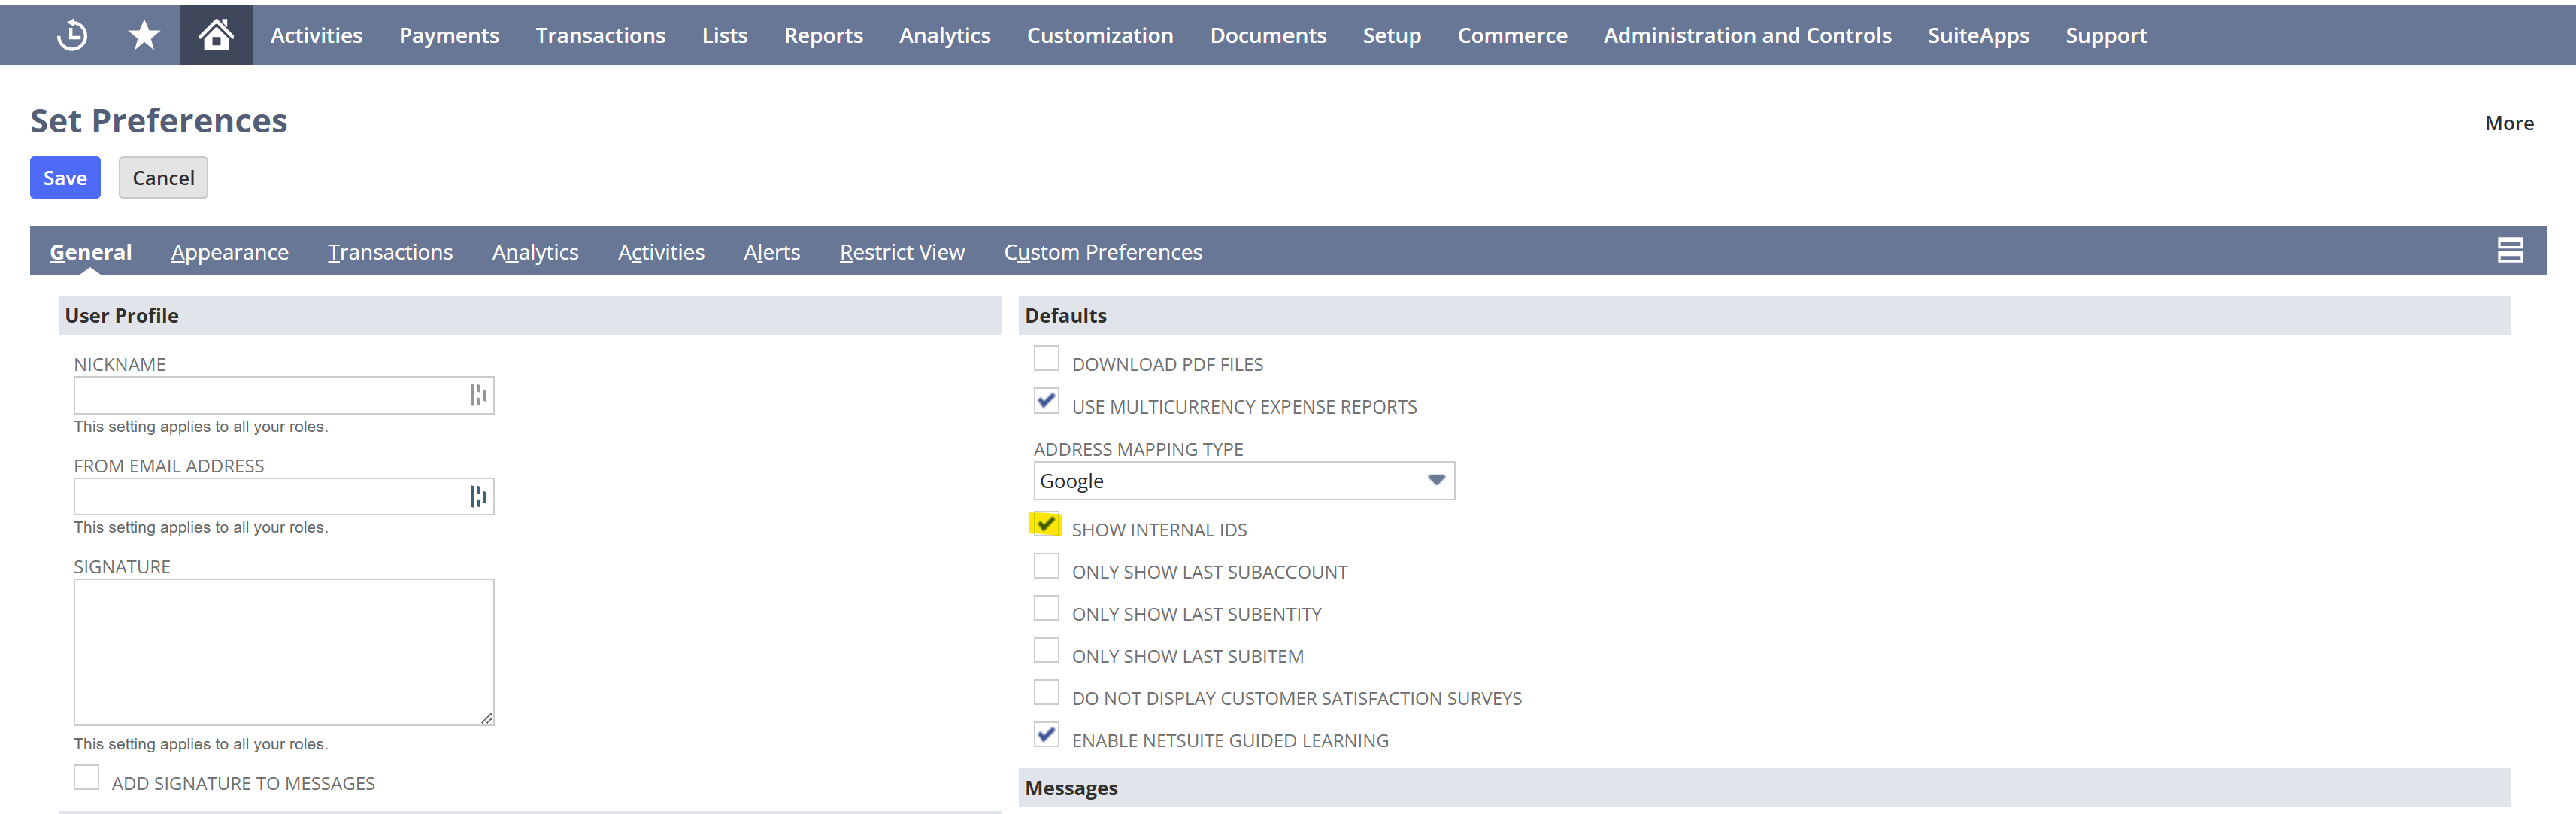
Step 1. Set Preferences
In NetSuite, navigate to the Home icon >> Set Preferences
Check the box to 'Show Internal IDS' and click 'Save.'
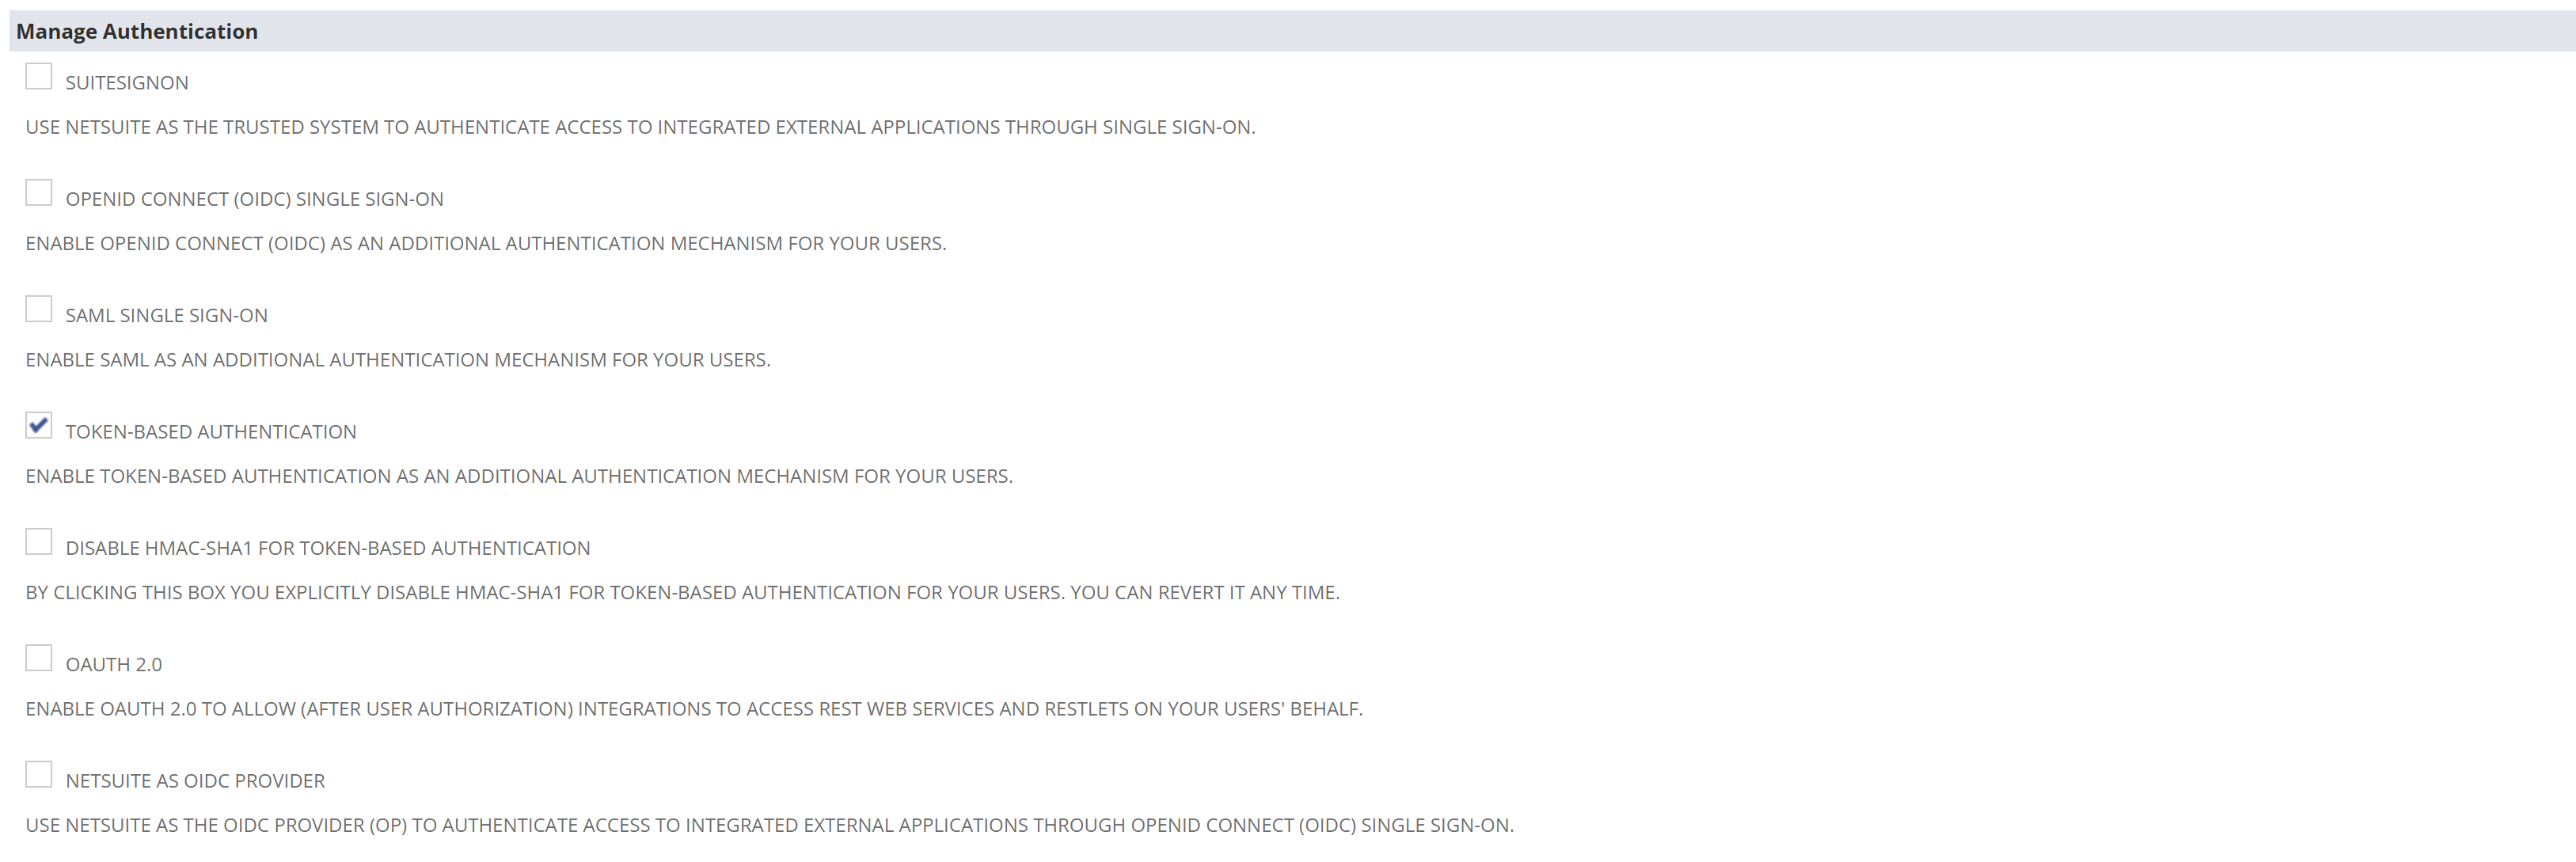
Step 2. Enable SuiteCloud Features
In NetSuite, navigate to Setup >> Company >> Enable Features >> Suite Cloud >> Manage Authentification
Verify the following Features are enabled (see checked boxes)
SuiteBuilder

SuiteScript

SuiteFlow

SuiteGL

SuiteTalk (Web Services)

Manage Authentication
SuiteCloud Development Framework

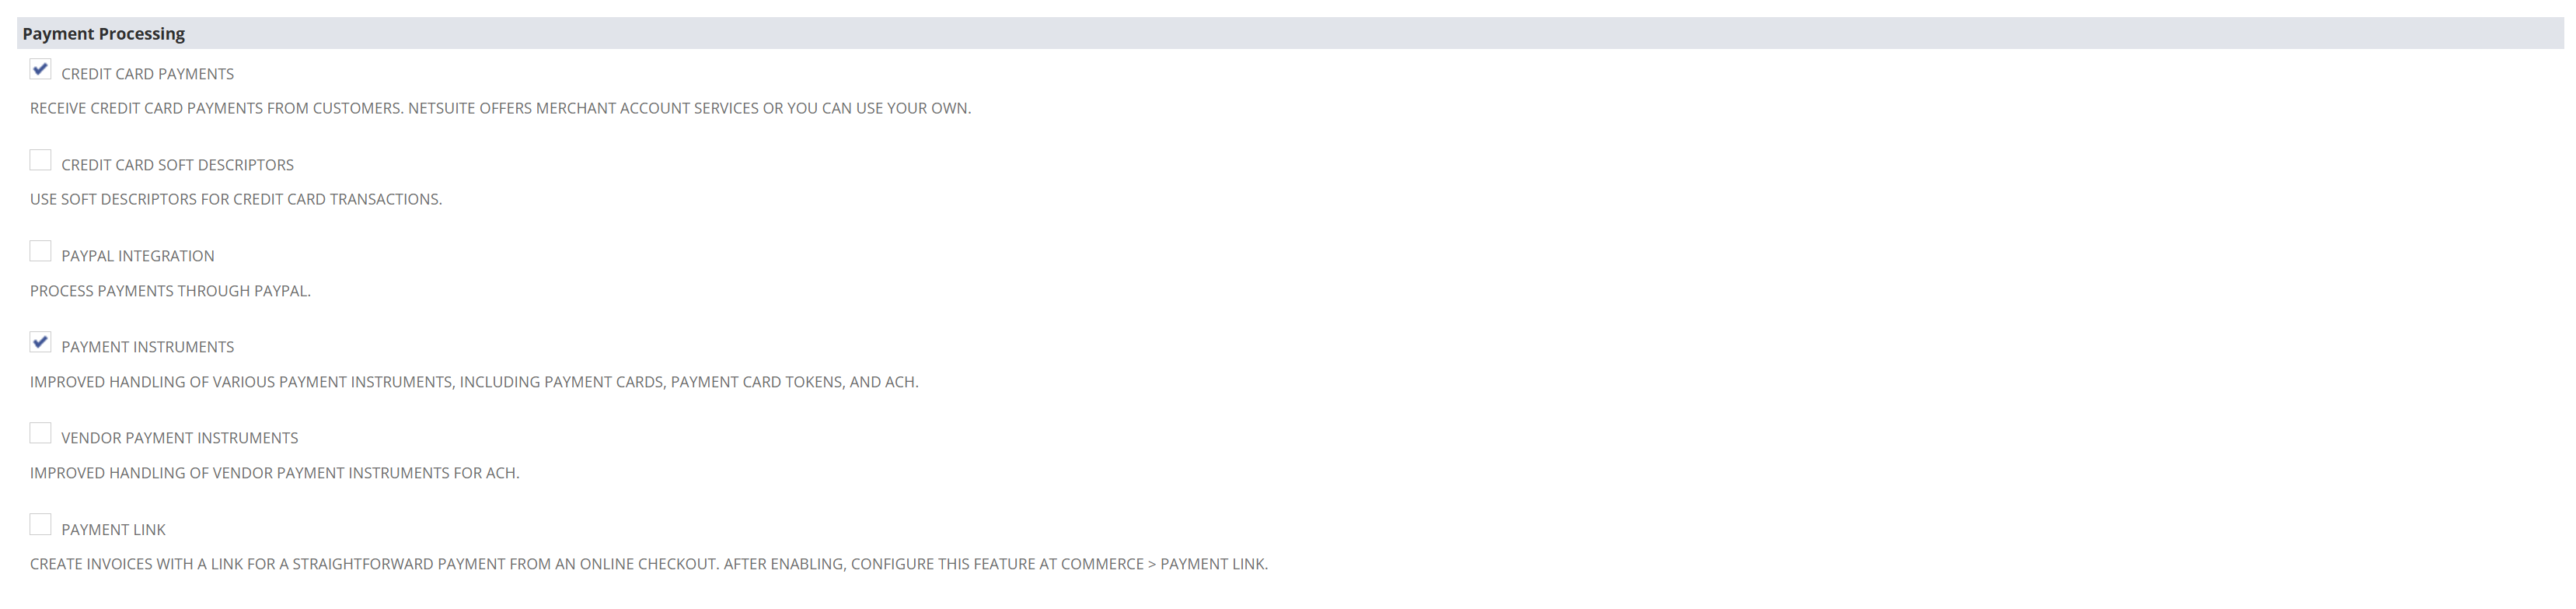
Step 3. Enabling Payment Processing Features
In NetSuite, navigate to Setup >> Company >> Enable Features >> Transactions.
Verify that the following boxes are checked under the Payment Processing section.
Of note: Payment Instruments must be enabled to populate the payment method on the payment and to display the reference number within the deposit list in NetSuite.
Step 4. Creating an Integration Record
In NetSuite, navigate to Setup >> Integrations >> Manage Integrations
Click 'New'
Set the name to 'Accounting Link Online'
Enter the concurrency limit you want to allocate to the integration. (**Must be greater than or equal to 1**)

CHECK
- TOKEN BASED-AUTHENTIFICATION
UNCHECK
- TBA: ISSUE TOKEN ENDPOINT
- TBA: AUTHORIZATION FLOW
- AUTHORIZATION CODE GRANT
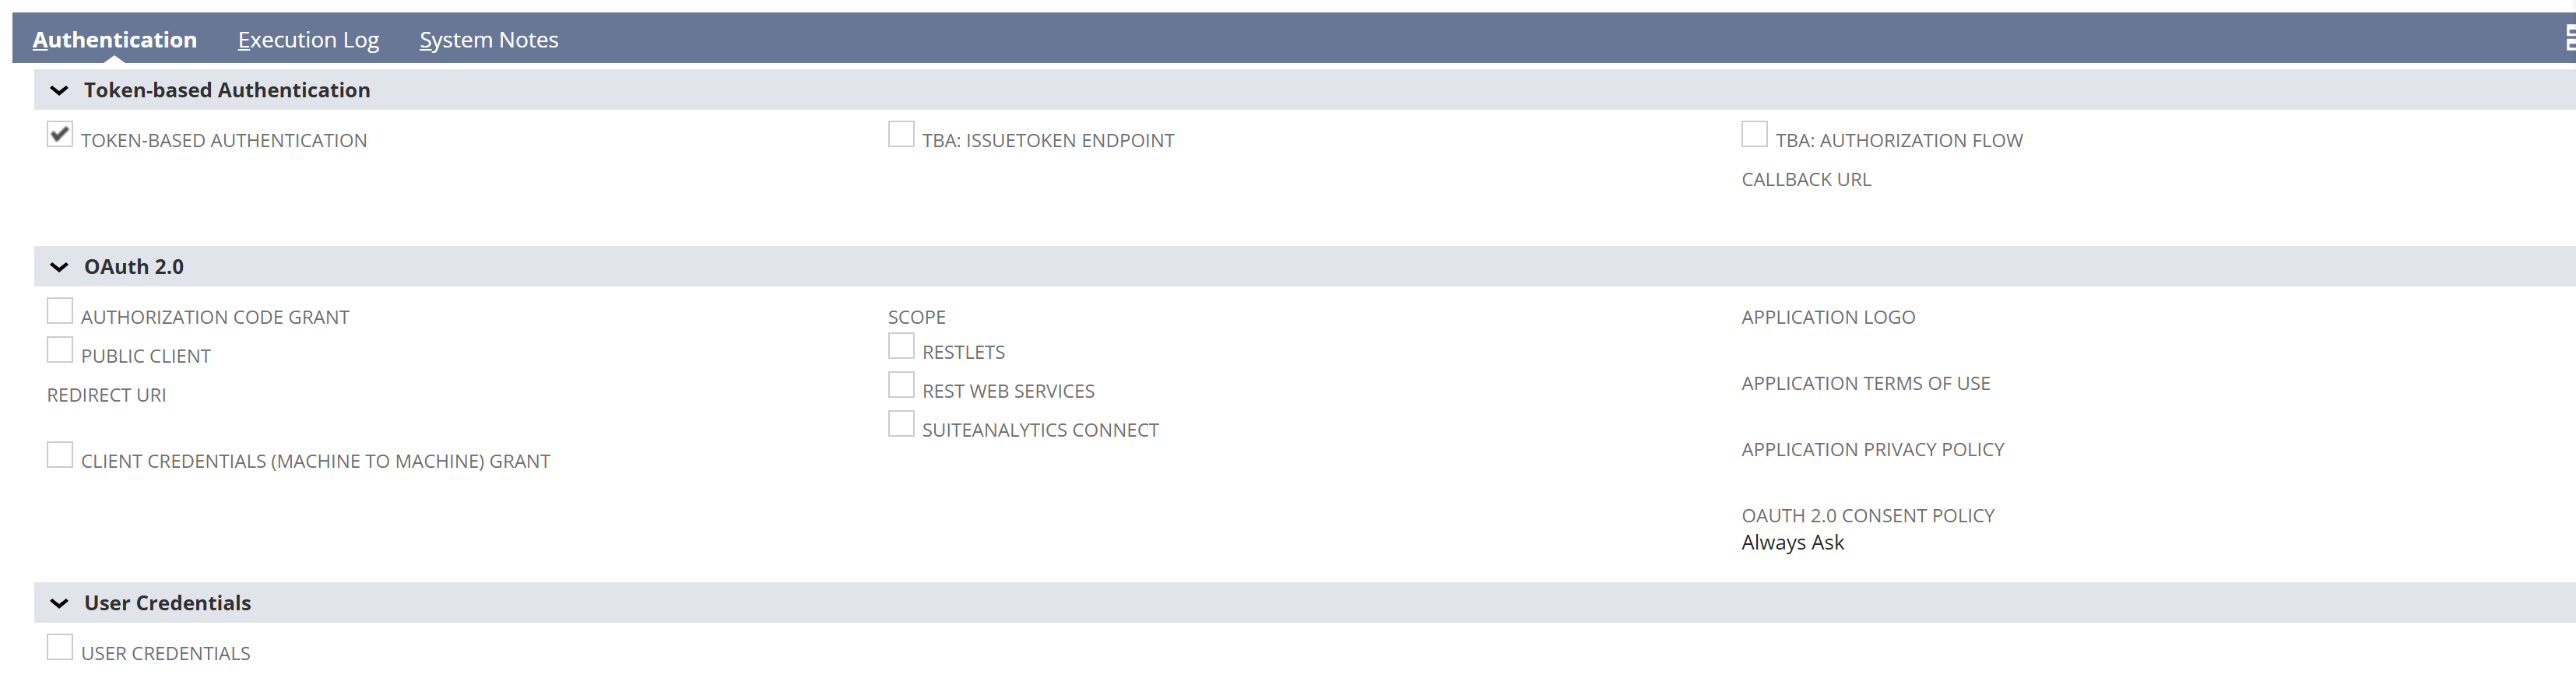
Save the integration record.
Step 5. Creating a Role
In NetSuite, navigate to Setup >> Users/Roles >> Manage Roles >> New
Create a role named 'Accounting Link Online'

In the Subsidiary Restrictions section, choose the 'Selected' option, and highlight which subsidiary you would like the integration to have access to.

In the Authentication section, check the box for 'Web Services Only Role'.

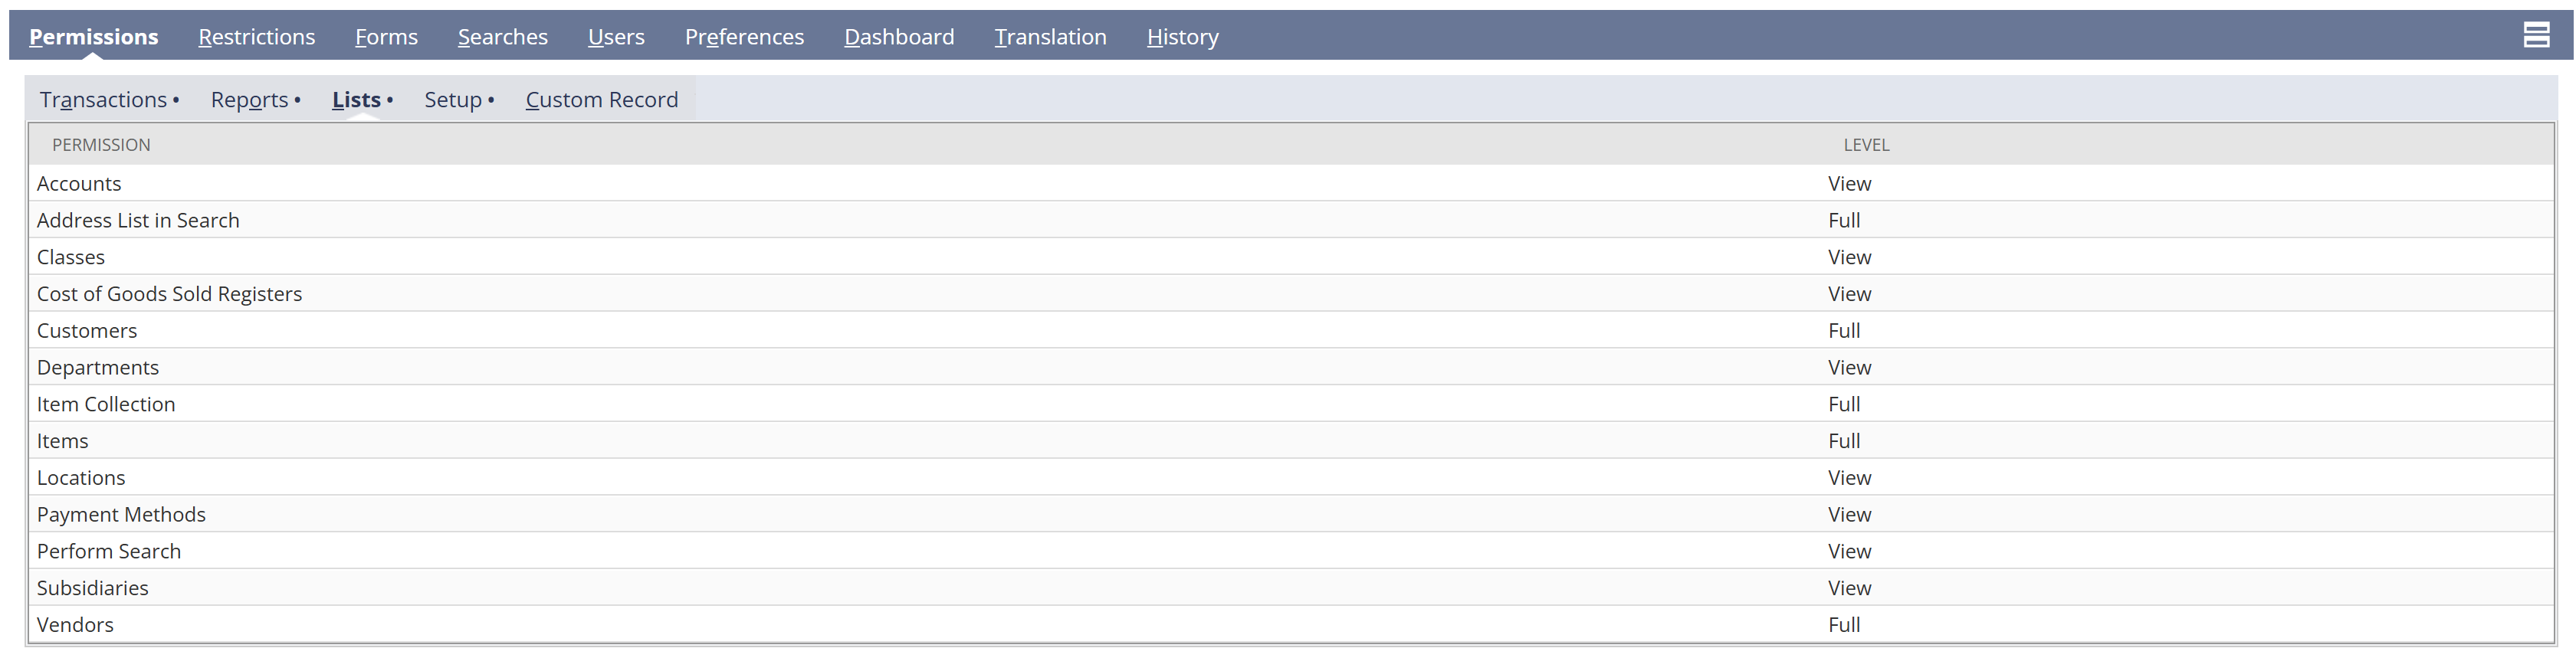
Within the Permissions tab, there are sub-tabs that dictate what Accounting Link has access to (Transactions, Reports, Lists, etc.). Update the permissions and levels in each tab to match below.
Transactions

Reports

Lists
Setup

Step 6. Creating A User
In NetSuite, navigate to Lists >> Employees >> New Employee. Add an Employee with the following information:
- Employee Name: Accounting Link Online
- Initials: ALO
- Email: Choose an email that you and your team have access to
- Subsidiary: The Company you want Accounting Link to have access to
- Access: Check 'Give Access'
Assign the Accounting Link Online Role that was created in the previous section.
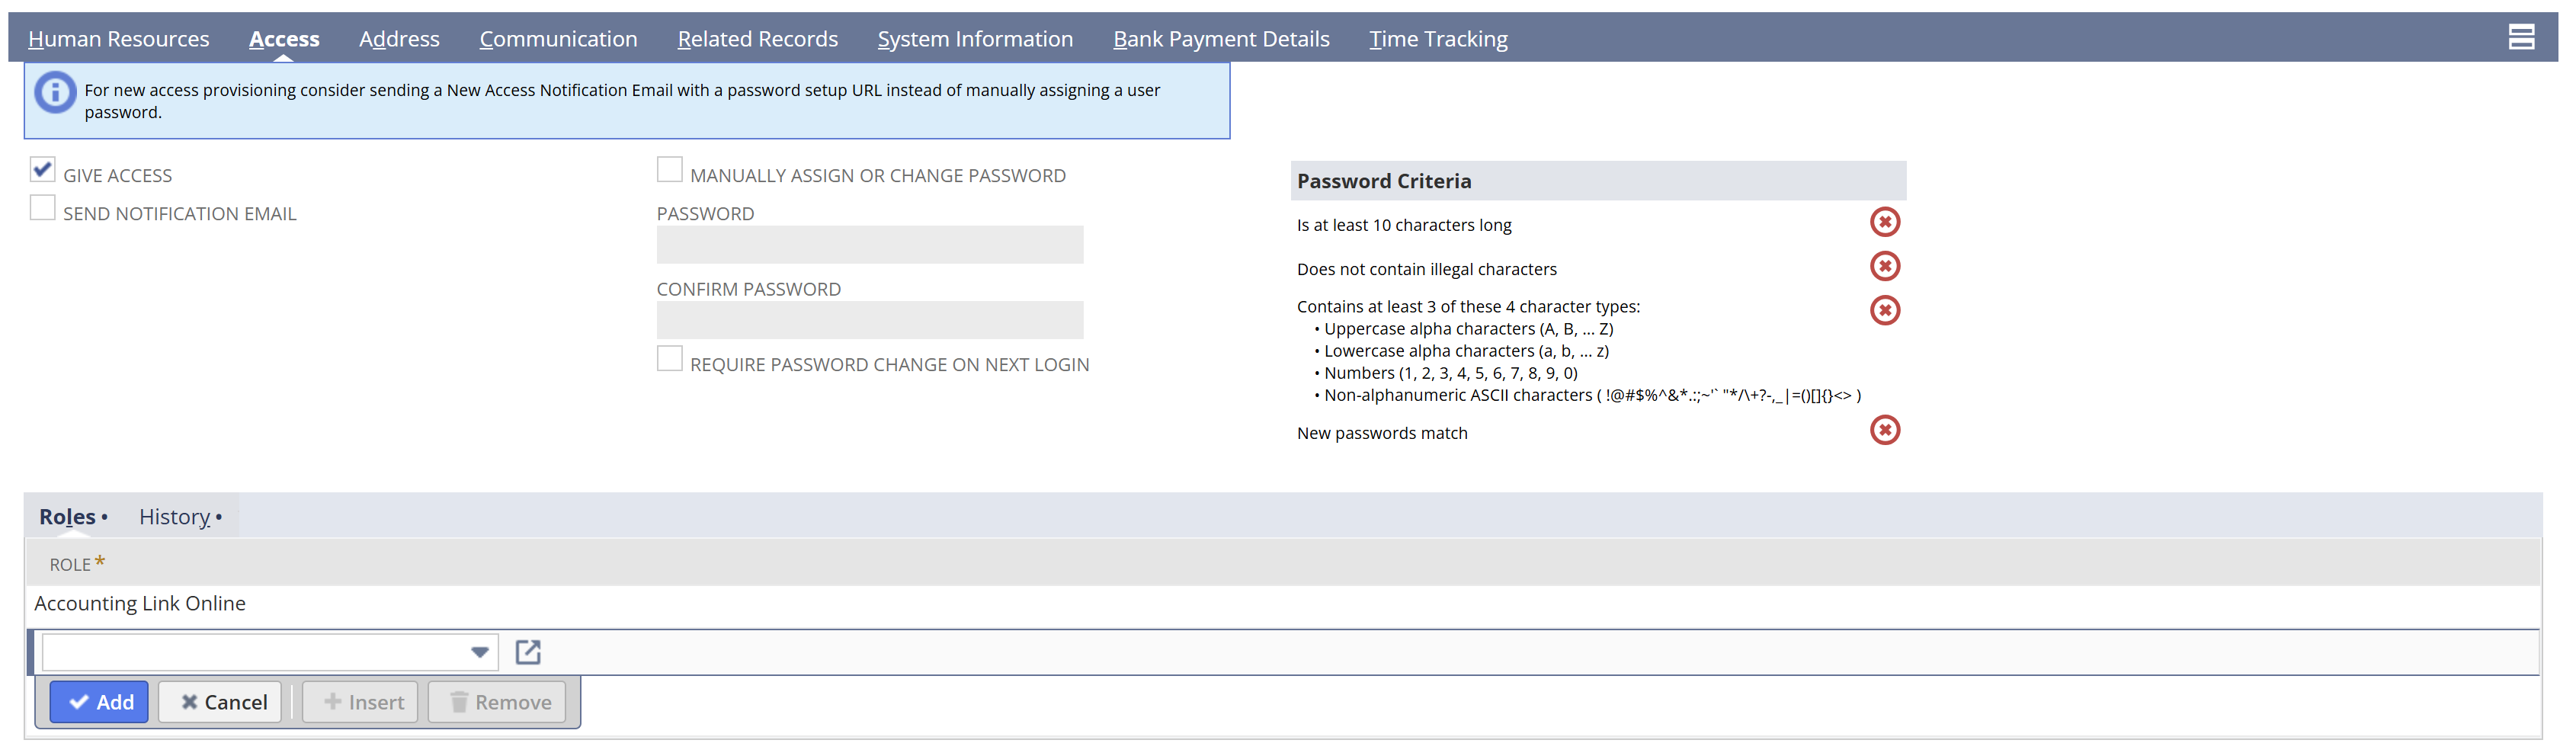
Create the User.
Step 7. Create an Access Token for the Integration Record, User, and Role
In NetSuite, navigate to Setup >> Users/Roles >> Access Tokens >> New
Select the Integration Record, User, and Role created in the previous steps. The Access Token and Access Token Secret will be displayed after clicking 'Save.'
Step 8. Locate your Account Id
In NetSuite, navigate to Setup >> Company >> Company Information.
On the right side of the page, under the Time Zone, the ACCOUNT ID is listed.
Step 9. Locating your Subsidiary Internal Id
In NetSuite, navigate to Setup >> Company >> Subsidiaries.
Within the Subsidiary record (select a subsidiary to view the details), locate the Internal ID. The internal ID will consist of a short numeric value.
Of note, if you are using a NetSuite Sandbox Account, these steps will need to be repeated for your Production account. These credentials are not transferable between Sandbox and Production environments. NetSuite Sandbox account numbers typically contain the suffix _SB and 'Sandbox' is displayed in the header of the NetSuite environment.

